Difference between revisions of "Cage Masts"
| Line 1: | Line 1: | ||
A brief history of cage masts, their design and construction, and an attempt to draw them more realistically in Shipbucket. | A brief history of cage masts, their design and construction, and an attempt to draw them more realistically in Shipbucket. | ||
| + | |||
| + | The following website is and excellent resource, the below is based on it. | ||
https://www.usni.org/magazines/naval-history-magazine/2022/february/closer-look-cage-masts-0 | https://www.usni.org/magazines/naval-history-magazine/2022/february/closer-look-cage-masts-0 | ||
| + | |||
| + | '''Realistic cage mast drawing in SB:''' | ||
| + | |||
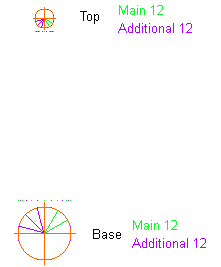
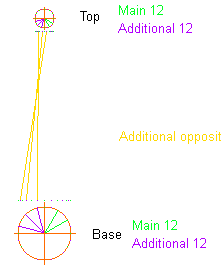
| + | For a US standard 48 member cage mast, start by marking out top and bottom circles with 24 members each. I split them for clarity and convenience into main and additional (this will be useful for shading). Each circle needs 24 dots (12 each) because each is connected in two directions. In reality we will only draw the foreground 12 + 12. Green are at 0, 30, 60, 90 etc. degrees, purple are at 15, 45, 75 etc. Set up lines of guide dots. I have chosen to spread them out where the circle would make them overlap if followed too strictly. | ||
[[File:CM1.png]] | [[File:CM1.png]] | ||
| + | |||
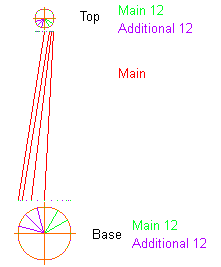
| + | Start adding the main lines. You only need to do one side because we can mirror it later. Each rotates 90 degrees which is conveniently 3 dots of the same colour (green in this case). | ||
[[File:CM2.png]] | [[File:CM2.png]] | ||
| + | |||
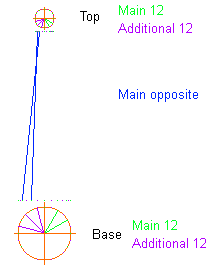
| + | Now draw the main members in the opposing direction. Note you don't need most here as some will be covered by the mirroring. Be careful as you count dots around the circle, you can use the top views as reference or count to the end and back. If you don't work in layers heaven help you from this point on. | ||
[[File:CM3.png]] | [[File:CM3.png]] | ||
| + | |||
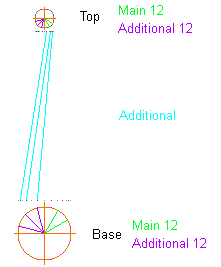
| + | Repeat as above for the additional members, join the purple dots. | ||
[[File:CM4.png]] | [[File:CM4.png]] | ||
| + | |||
| + | And the opposite direction. | ||
[[File:CM5.png]] | [[File:CM5.png]] | ||
| + | |||
| + | Now mirror everything in each layer and stack them in this order. You can change this up depending on what suits you. | ||
[[File:CM6.png]] | [[File:CM6.png]] | ||
| + | |||
| + | Use each layer to pick a grey shade, experiment to see what works. It will probably need some manual adjustment in the top third to get rid of 2 pixel lines. | ||
[[File:CM7.png]] | [[File:CM7.png]] | ||
| + | |||
| + | Check references and add horizontal members. I don't think there are hard rules for those. | ||
[[Category:Articles]] | [[Category:Articles]] | ||
Latest revision as of 11:18, 22 October 2024
A brief history of cage masts, their design and construction, and an attempt to draw them more realistically in Shipbucket.
The following website is and excellent resource, the below is based on it.
https://www.usni.org/magazines/naval-history-magazine/2022/february/closer-look-cage-masts-0
Realistic cage mast drawing in SB:
For a US standard 48 member cage mast, start by marking out top and bottom circles with 24 members each. I split them for clarity and convenience into main and additional (this will be useful for shading). Each circle needs 24 dots (12 each) because each is connected in two directions. In reality we will only draw the foreground 12 + 12. Green are at 0, 30, 60, 90 etc. degrees, purple are at 15, 45, 75 etc. Set up lines of guide dots. I have chosen to spread them out where the circle would make them overlap if followed too strictly.
Start adding the main lines. You only need to do one side because we can mirror it later. Each rotates 90 degrees which is conveniently 3 dots of the same colour (green in this case).
Now draw the main members in the opposing direction. Note you don't need most here as some will be covered by the mirroring. Be careful as you count dots around the circle, you can use the top views as reference or count to the end and back. If you don't work in layers heaven help you from this point on.
Repeat as above for the additional members, join the purple dots.
And the opposite direction.
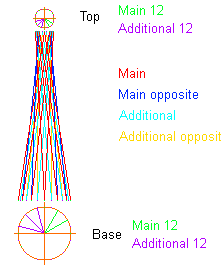
Now mirror everything in each layer and stack them in this order. You can change this up depending on what suits you.
Use each layer to pick a grey shade, experiment to see what works. It will probably need some manual adjustment in the top third to get rid of 2 pixel lines.
Check references and add horizontal members. I don't think there are hard rules for those.
